As promised last week, here are more things that can be made from knitting a simple rectangle. Today we'll talk about purses. Here are two styles of purses I have made from rectangles.
As you can see, purses 1 and 2 are the same style but different dimensions. These can be made in any dimensions you chose. You just need to set up your plan so that it is balanced and eye-pleasing. I have lined all my purses. You can find really swanky remnants to use for linings at the fabric stores. The fabric stores usually have a good supply of purse handles as well. These handles came in a set of two and are faux tortoise shell.
I have knitted purses 1 and 2 with wool yarn and felted the work after it was knit up. This gives you a very strong fabric, suitable for a handbag.
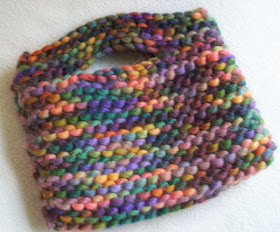
Purse #3 is a different style. It does not use a separate handle but has a self handle of the same yarn as the rest of the body of the purse. It is knit in an acrylic yarn, therefore, not felted. It is lined, which helps it to have some heft and stability.
Here are the architectural drawings (made by me) to show you how to build your purse.
For purses 1 and 2, I cast on or made a chain (depending on if you're knitting or crocheting) for one of the flaps you'll see at the top and bottom of diagram 1. The flap will be folded to the inside of the purse (diagram 1a), giving the purse top a straight edge. The flaps will encase the handles, then be sewn down on the purse interior. This is a good reason to have a lining because it hides all this interior structure.
After making the flap the size you want it, you will increase on either side of the flap until you have purse dimensions that you like. When your rectangle is a long as you'd like it to be (don't forget it's going to be folded in half) you will then make the flap on the opposite end.
When I do this, I count stitches and make a note. e.g. Flap = 12 stitches, extensions on either side of flap = 16 stitches. Therefore, after you have made the extensions and are knitting on the large rectangle which will become the outside of your purse, you will be knitting on 44 stitches. When your large rectangle is as large as you want it, you will then cast off the first set of 16 stitches, knit the remaining stitches on the row. Turn, cast off the first 16 stitches on the next row and knit on the remaining 12 stitches of the tab until it is the same size as the opposite tab.
Fold your rectangle in half and sew up the sides. Attach the handles and fold the flap to the inside and sew it down. Line it and...........voila ♥ a beautiful purse.
Diagram of purse 2
This one is a lot simpler. Just a rectangle of whatever size you choose with an opening on both the top and bottom of the rectangle. Make these openings the same number of rows from your purses edge so that they match up when you sew the sides together.
You make the openings by casting off on one row then casting on on the next row. Again, count stitches. e.g. You've knit an inch or so (counted rows and made a note) on 40 stitches, now you want to place your opening. You would knit, say 16 stitches, then cast off 10 stitches, then knit the remaining 16 stitches. Turn and knit the first 16 stitches, then cast on 12 stitches and continue knitting the remaining 16 stitches of the row. Continue knitting on the original 40 stitches until it's as long as you like, then repeat the process for another opening on the other end of your work. Finish up by knitting the same number of rows as you did at the opposite end before you made the opening. Fold up the sides and sew the seam. Line it with a remnant. Voila ♥ another cute purse.


I adore all of them but that second one really grabbed my eye. Love it!!
ReplyDeleteThey are all cute. I think the third one is really fun. Pinning this:)
ReplyDeleteAwesome. I am not fond of rigid handles but your purses look great. I like version #3 because of the self-handles and the colours. Thanks for the easy instructions, you are a natural teacher. Nelly
ReplyDeleteYou are so talented! The handles look great with the purse. I also love the embellishments you added.
ReplyDeleteI love handmade purses! These are very cozy!
ReplyDeleteI love the pink one! You are so talented.
ReplyDeleteThanks for sharing, Rita!
ReplyDeleteBeautiful! They look super fun to make!
ReplyDeleteAll three of the purses look adorable, but the second is eye catching. I wish I could knit.
ReplyDelete