Translate

Showing posts with label yarn. Show all posts

Monday, July 21, 2014

Today is Monday

Today I looked through my yarn stash and discovered that I had no #5 yarn (chunky) yarn. That's a little heavier than #4 (worsted/double knitting), which I have lots of.

I made a little trip over to the only yarn store we have remaining in my area. All others, sadly, have gone out of business. This yarn store that I planned to browse around in had a sign on the door - "CLOSED MONDAYS". sad, sad, sad.

To elevate my spirits a bit I went to the gelato store and got a double scoop and sat on a bench overlooking the canal and ate my mango-coconut gelato while watching pigeons, house sparrows and ducks all looking for a handout.


I felt a bit desperate for the yarn because I'm soon going on a bus tour and I want to knit during the ride. I am wanting to make some hats like these to put in my etsy shop. I think it's perfect timing for thinking about hats. School will be starting in a month. College co-eds will be descending on campuses and winter won't be far behind.


Because the yarn shop was closed, I made a trip to the local sewing and craft store. They do have a yarn department. They did happen to have the weight of yarn I need to make this pattern - plus - it was on sale!!! I bought enough to make three hats. Here's the colors.


Tuesday, October 15, 2013

I'M ALMOST OUT OF RECTANGLES

Third and final week of THE RECTANGLE TUTORIAL and all the marvelous things that can be made by simply knitting up or crocheting up a simple rectangle. I'm sure there are many, many more that I haven't thought of. I would love for you to add the things you thought of that can be fashioned with a rectangle.

Today, we'll talk about shrugs and fingerless gloves. Both are created from a simple rectangle.

For the shrug I crocheted a rectangle 40" long. (Don't forget to always make a foundation chain for crochet and a "cast-on" row for knitting by using a larger hook/needle than the one you'll use to make the body of the item. The reason for this is that most times this beginning row of your work ends up being too tight and your garment looks squeezed and tight at the bottom. If you use a larger implement, this will not happen.

Therefore, a 40-42" first row.* Knit/crochet for 15-16". You should now have a rectangle that measures approximately 40" by 16". Fold this rectangle in half width-wise. Now you have a rectangle with measurements of 40" by 8". Sew each side of the open end of your rectangle together for 8" (for sleeves). In the middle of your rectangle you'll have a large opening. This is where you'll make a ruffled collar. When your rectangle is unfolded and opened up, you will see 2 sleeves on either side and the large opening for your head and shoulders and the bottom back, which I leave unadorned. Voila ♥ a beautiful shrug/bolero.


note: I used a double crochet stitch for this bolero - I made a chain 1 between each DC - I wanted it to have an "airy", mesh look.


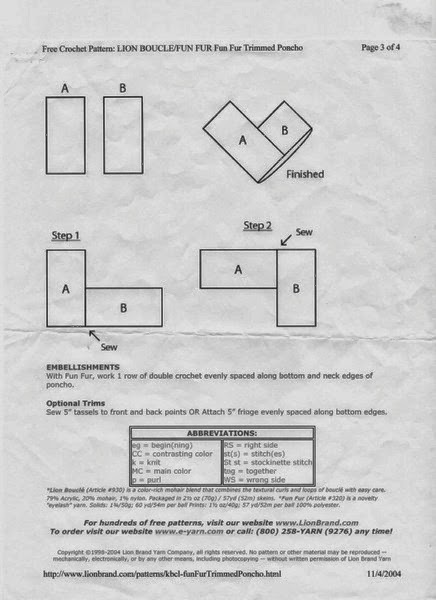
Figure #1 is a representation of the rectangle you'll create for your shrug. Figure #2 is the same rectangle, folded in half with the stitches to create a tube sleeve on either open end of the folded rectangle. The open space in between the sleeves is for the neck and shoulders. On one side of this space, I made a ruffle of contrasting color. I left the other side of the open space plain to form the bottom back of the shrug.

~~~~~~~~~~~~~~~~~~~~~~~~~~~~~~~~~~~~~~~~~~~~~~~~~~~~~~~~~~~~~~~~~~~~~~~~


Final item: a pair of those trendy fingerless gloves. Knit or crochet a 5" by 7" rectangle. Sew the 5" sides together, leaving an opening for the thumb. (I always use my own hand when doing this). First, I sew up the part below the thumb - the part closest to the fingers. Then I begin to sew from the wrist down to the thumb opening. This is when I use my own hand to determine how large that opening should be. On both sides of this opening, be sure to go over your seams to guarantee  there's no gaps in the seam when your hand is inserted in the glove. You can crochet a ruffle around the wrist of the glove or crochet shells, making the edge look scalloped, or leave it plain.


         The black gloves are longer than 5". You can make them any length you like.

I made these gloves using a single crochet stitch so that I would achieve a close knit to keep those winter chills out. Trimmed one pair with a ruffle in a contrasting yarn and left the other plain.


*check your yarn label to see how many stitches per inch with what size needle/hook. Do the math and you'll know how many stitches you'll need to get a certain length chain/row.

Happy stitching.

Tuesday, October 1, 2013

MAKE A PONCHO FROM A RECTANGLE

Today I’d like to share a tutorial with you. This is not my forte’ so it’s going to be rather amateurish. Someday I’ll figure out how to do nice drawings on the computer.

Ponchos is our subject today. The ponchos I’ve made are, in actuality, a big rectangle. No shaping capabilities required. Anybody can knit/crochet up a rectangle, right?

I’ll share with you how to make a poncho out of one rectangle (poncho #1) and an entirely different style poncho made with two rectangles (poncho #2).

This is a picture of poncho #1 that I made for myself. I like how this poncho hangs asymmetrically. I used ombre silk ribbon to make the fringe. 


This is a VERY IMPORTANT NOTE: since you are planning to create a specific measurement rectangle, it is not important to consider yarn weight,  or any other of those pesky little details you consider when making other kinds of garments. All you need to do is look at the wrapper of whatever yarn you choose to use and see what size hook or needle is used for this particular yarn. While you're looking at the wrapper, also look to see how many stitches there are per inch. You know from the schematic that you need a rectangle that is 20" across for poncho #1 and now you also know how many stitches there are per inch so the math principle would be: multiply the stitches per inch by 20" and you'll know how many stitches you'll need to work on. e.g. your yarn wrapper says 4 stitches per inch. You need 20". Therefore 4 times 20 = 80 stitches. 

These are the official instructions and measurements for this poncho #1 which I sourced from a magazine.


Poncho #2 is created from two same sized rectangles. You can knit or crochet the rectangles. The two rectangles need to be sewn together according to the drawings here.


I have made many of poncho #2 for little girls so I personally drew 3 graduating sizes of rectangles with the measurements and size for 3 different sizes of ponchos. 


There's a size small (3-7), a size medium (8-14) and size large (adult) in the little hand drawn rectangles. You need to make two (2) rectangles for one poncho and sew them together as per the diagram.

I think it's so amazing that you can make really cool fashions out of rectangles. Next week I will show you more items that can be fashioned from a simple rectangle.