Today I’d
like to share a tutorial with you. This is not my forte’ so it’s going to be
rather amateurish. Someday I’ll figure out how to do nice drawings on the
computer.
Ponchos is our subject today. The ponchos I’ve
made are, in actuality, a big rectangle. No shaping capabilities required.
Anybody can knit/crochet up a rectangle, right?
I’ll share
with you how to make a poncho out of one rectangle (poncho #1) and an entirely
different style poncho made with two rectangles (poncho #2).
This is a
picture of poncho #1 that I made for myself. I like how this poncho hangs asymmetrically. I used ombre silk ribbon to make the fringe.

This is a VERY IMPORTANT NOTE: since you are planning to create a specific measurement rectangle, it is not important to consider yarn weight, or any other of those pesky little details you consider when making other kinds of garments. All you need to do is look at the wrapper of whatever yarn you choose to use and see what size hook or needle is used for this particular yarn. While you're looking at the wrapper, also look to see how many stitches there are per inch. You know from the schematic that you need a rectangle that is 20" across for poncho #1 and now you also know how many stitches there are per inch so the math principle would be: multiply the stitches per inch by 20" and you'll know how many stitches you'll need to work on. e.g. your yarn wrapper says 4 stitches per inch. You need 20". Therefore 4 times 20 = 80 stitches.
These are
the official instructions and measurements for this poncho #1 which I sourced from
a magazine.

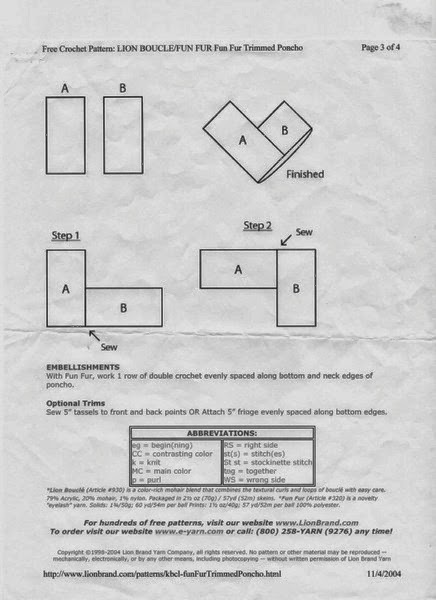
Poncho #2 is
created from two same sized rectangles. You can knit or crochet the rectangles.
The two rectangles need to be sewn together according to the drawings here.
.jpg)
I have made many
of poncho #2 for little girls so I personally drew 3 graduating sizes of
rectangles with the measurements and size for 3 different sizes of ponchos.
.jpg)
There's a size small (3-7), a size medium (8-14) and size large (adult) in the little hand drawn rectangles. You need to make two (2) rectangles for one poncho and sew them together as per the diagram.
I think it's so amazing that you can make really cool fashions out of rectangles. Next week I will show you more items that can be fashioned from a simple rectangle.
Yay for poncho season! I'm not a huge fan of knitting or crocheting but I want to make one from a thrifted piece of wool!
ReplyDeleteVery useful info, thanks! I hope I can zoom into your instructions for poncho #1. Very pretty with the fringes, by the way. I am almost finished rectangle #2 or your version #2, though. I will show you when I am finished. I did not know the stitch/inch ratio was included in the yarn wrapper. Got to go look now. ♥ Nelly
ReplyDeleteOh, I love ponchos and I have many but I could never make one! I got lost at the figuring the stitches! Love yours and the fringe!
ReplyDeleteThese are so fun! And so adorable on those little toddlers...!
ReplyDeleteYour poncho looks so warm and cozy, very timely! Great info, thanks!
ReplyDeleteYou are completely speaking Greek to me when you describe how you made the poncho. It is so beautiful!! You are very talented.
ReplyDeleteWow, that IS easy! If I actually had the time, I might just take up this project... getting colder. But I can only imagine my kids messing it up. :) I think I'll wait 30 years ;)
ReplyDeleteI don't wear ponchos because I look like a circus tent in them. But I still think they are pretty nifty.
ReplyDeleteCute poncho, I love the color and the fringe :)
ReplyDeleteLove that poncho. You are so talented. My daughter recently started knitting. She was sewing but decided she really didn't enjoy it. She seems to like knitting.
ReplyDeleteI can't read the instructions for Poncho #1 on your October blog. Could you tell me the dimensions and how big th neck opening is? Thank you.
ReplyDeleteKaren, you should have a 20" x 48" rectangle. The foundation chain of 20" is labeled in the diagram with an "A" on the right and a "B" on the left.
DeleteOn the 48" left side, you'll see point "A" on the top left and 20" down from that, you'll see point "B".
Fold your rectangle so that the 2 point "A"'s meet and the 2 point "B"'s meet. Sew up from point A to B. The remaining 28" is your neck opening.
I hope this is helpful to you. Let me know how you make out.
How many loops needed to start adult size poncho
DeleteHere's a video that might help:
ReplyDeletehttps://youtu.be/xJwSBv6Hsuc
Great idea and execution. A poncho is something that comes in handy often. My wool poncho is perfect whenever the temperatures outside drop a little.
ReplyDelete